In my previous life as a technical writer, I worked with screenshots a lot. As a genealogist, I still rely on screenshots for various things, especially when writing instructional materials. As an editor for a national genealogy publication, I use screenshots all the time.
Screenshots, or screen captures, can serve a variety of purposes, but are especially useful for genealogists who write or present instructional materials. While the typical, standard screenshot is usually enough for presentations or web-based writing, it is not entirely suitable for print publications.
When you view something on your computer screen, it’s at a lower resolution than what you would see on a printed page. Likewise, when you create a screen capture, it’s produced at this low resolution. This means that these screen captures will print pixilated or blurry.
There are two solutions that I know of to produce screenshots suitable for print, one working slightly better than the other. But before I get into the details, I want to show you a side-by-side comparison. Take a moment to open this PDF. When you enlarge it to 100%, you should start to notice the pixilation in the “Okay” and “Better” versions. If you keep enlarging the PDF, you’ll see a huge difference between the three versions. While the “Best” version does start to pixilate around 200%, it’s not nearly as bad as the other versions. Since many publications are also available digitally, you’ll want to have the smoothest image possible. You can also see the difference when you print the PDF—it’s slight, but it’s there. The “Best” version is the crispest of the three. The “Okay” version is just that—okay. But if you have the ability to use one of the two options below, it will certainly make the screenshot more attractive.
Option #1 (a.k.a. Better)
If you use a screen capture tool that doesn’t allow for a change in resolution or scaling, such as the Windows Snipping Tool, you can create the screenshot and make a quick change in Photoshop (PS) or Photoshop Elements (PSE) with these steps:
- Open the image in PS or PSE.
- Open the Image Size dialog box:
- For PS, go to the Image menu and select Image Size.
- For PSE, go to the Image menu, choose, Resize, then Image Size.
- In the dialog box, make sure the Resample box is checked, and select Bicubic Smoother. Then change the Resolution to 300 pixels/inch.
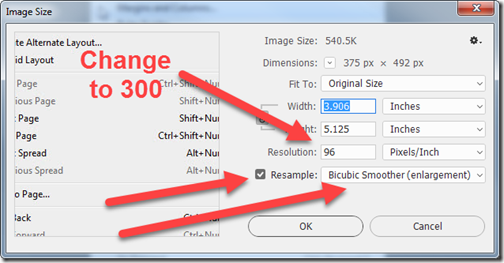
- Click Ok.
Easy peasy. I imagine this technique can be done in other image editing software, but I can’t point to specifics. With the steps above, you should be able to find your software’s counterparts.
Option #2 (a.k.a. Best)
This option requires the use of SnagIt. I am not aware of any other screen capturing tools that allow you to perform these tasks (if you are aware of one, please leave a comment, as I would love to know!). I have used SnagIt for almost 20 years. It’s a wonderful tool that allows you to do even more beyond screen captures. It even has an editing tool that allows you to annotate your screenshots (like the ones in this post) among other things. If you use screenshots in your research, work, writing, or presentations, it’s well worth the $49.95 price tag (and no, I don’t make anything off promoting this product—I just really love it!). (Side note: I used SnagIt to create a video about using Flip-Pal’s stitching software—very cool option, and very easy!)
After lots of experimenting many years ago, I finally found a way to capture crisp screenshots for print. Here’s my secret:
- Open SnagIt.
- Choose the Image tab on the left side.
- In the Selection menu, choose whatever option you need (region, window, etc.).
- In the Effects menu, choose Scale Image. Click on the gear icon, make sure Scale by percentage is selected, and type 400 into the Width box. If Lock aspect ratio is on, it will automatically change the height to 400 as well; otherwise, type in 400 in the Height box.
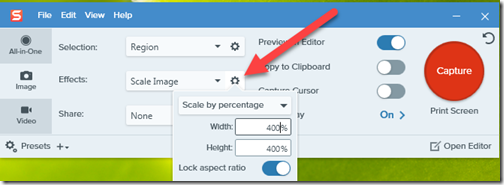
- Click the Effects menu again, and choose Add another effect down at the bottom.
- Click on the new Effects menu and choose Image Resolution. Click on the gear icon and change the Resolution to 300.
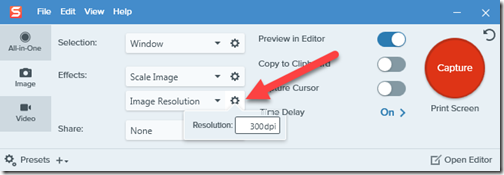
- Proceed with capturing. That’s it! Once you’ve collected your screenshot, it’s print-ready.
These instructions are based on SnagIt 2020. If you have an older version (I just recently upgraded from 9!), the items are the same, they just may be in different places. Feel free to contact me and I can help point you in the right direction.
This might seem like a lengthier process than the one above, but once you know what to do, it’s pretty easy. Plus, you can set up a preset so you don’t have to remember to change the settings each time.
Note: Scaling to 400% will give you a good sized image suitable for print. If for some reason you need it a little larger, just increase the percentage.
There you have it. Two options for making screenshots that are suitable for printing.


I use HyperSnap, http://www.hyperionics.com/ I use it to do a quick capture of online documents that I want to refer to later, especially websites that do not have a print option or a disabled right click.
Thanks for the tip, Barb. I just took a look at their user manual and it appears that HyperSnap does allow for adjusting the resolution and scaling as I suggest in this article. And, it’s a little cheaper than SnagIt, so thanks for sharing!!