
For 26 weeks I will take you on a family history journey through the alphabet, one letter at a time. I have decided that each post will be educational in nature, focusing on topics related to resources, methodology, tools, etc. Although the challenge is complete, there are still some people who are finishing up and Alona, the host, is encouraging others to participate anyway. Additional information on the challenge, can be found at Take the ‘Family History Through the Alphabet’ Challenge.
 Although I could spend weeks writing about organization, I decided on a specific area of organization, that being digital images. In this post I’ll share with you how I structure my files, how I name them, and how to add metadata for future reference.
Over the last few years, the organizational structure for my digital images has evolved and I am quite content with where it is now. I won’t bore you with the details of the evolution, or how I’m still in the process of getting all my files named correctly, but I will share with you what I do.
Hierarchy
First, I have a main folder named Family Tree. This folder holds everything related to my personal genealogy research, including my Legacy Family Tree file, digital images of records, photos, resources (such as digitized county histories and maps), correspondence, reports, forms and templates, articles and stories I’ve written or am working on, etc. For the purpose of this post, I will focus on my Images & Documents folder, which contains three subfolders, one for records related to my husband’s family, one for my family, and a research folder. Note: I named my Images & Document folder with “00 –” at the beginning of the folder name so that it appears at the top of my list.
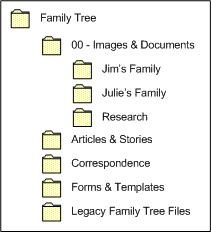
The two family folders are organized by surname and will be the focus of this post. But before I move onto that, I want to share what the Research folder is and how I use it. The Research folder is further broken down into four subfolders:
- Active Research – This folder contains an array of materials that pertain to some of my bigger research problems. It’s arranged by research problem and the files could be digital images, notes, proof summaries, etc. If I feel that something has been proven, I will move the files to the applicable family/surname folder.
- Reports – This folder contains mostly spreadsheets that keep track of records I need to search or pull.
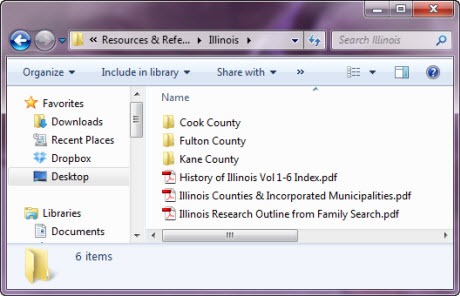
- Resources & Reference Materials – This folder contains various resources such as digitized county histories, maps, atlases, locality guides, and other information on a particular area. The subfolders are arranged by state, then county, then city/town (if necessary). For example, below is my Illinois folder. Anything that pertains to the state as a whole is in that main folder. Anything that pertains to one of the three counties goes in the applicable folder. The Cook County folder also has a subfolder for Chicago.
- To Process – This folder contains a variety of digital records that I have obtain but have not yet been able to process. Once they are processed, they will get renamed and moved to the appropriate family/surname folder.
As I mentioned earlier, the family folder (there’s one for me and one for my husband) is broken down by surname. You’ll notice in the image below that I again use numbers in front of folder titles, again to bring them to the top. When I don’t know the maiden name of a female, it goes in the Unknown Maiden Name folder. The Unknowns folder holds a few unidentified photos and some documents from my family papers that I don’t know who they belong to.
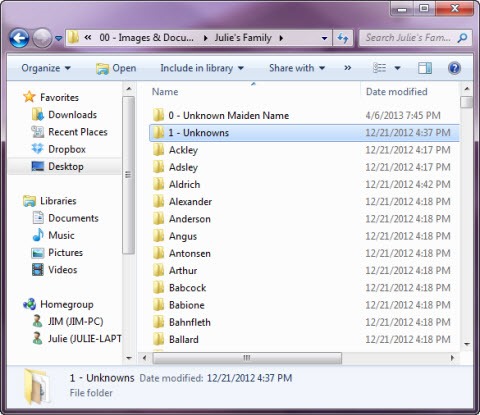
Within these surname folders, there is a Photos folder and all the digital records associated with that surname. My naming convention is how I keep them organized without have to add yet another layer of folders.

So now that you’ve seen how my files and folders are structured, let’s turn to the naming convention I use.
Naming Convention
This is the part that has evolved over time and I have found something that works for me and am in the process of updating all of my files to follow the same convention. At any rate, here is how I name my files:
LAST, First Middle RIN – Year Record
The RIN is the number assigned to each individual in my database (and will carry over to other programs if I ever switch). This helps me deal with people of the same name, as well as knowing exactly which person a record matches up to in my database.
So for example, the file name for the 1847 Luxembourg census record for my fourth great-grandfather, Heinrich Schwartz, would look like this:
SCHWARTZ, Heinrich 10132 – 1847 Luxembourg Census
Another example, using a middle name, would be my grandfather’s death certificate, which would look like this:
CAHILL, John Francis 96 – 1984 County Death Certificate
I would also like to note that I file everything by the main person of the record. So for example, a female’s death certificate would be filed under her maiden name, not her married name. Additionally, I only save one copy of a census record filed under the head (when it’s the female, again, it goes under her maiden name). I’ve found that this is easier for me than dealing with family groups, especially when multiple marriages are involved.
Metadata
The last thing I want to share with you is how I use metadata to further define my digital images. Metadata is sometimes tricky and different depending on the file type. All of my images are saved as high-resolution JPG files, so the process I will demonstrate will work for those files types, as well as a few others including TIF files.
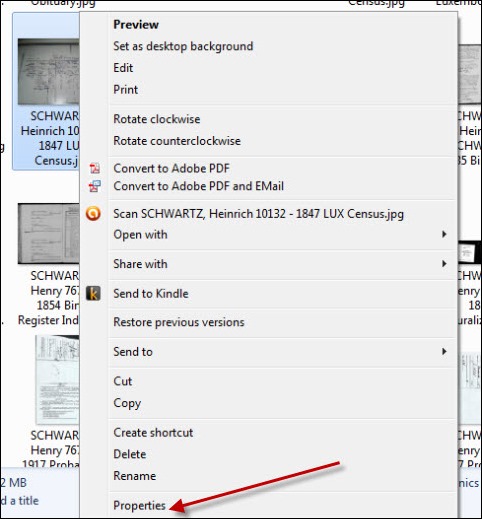
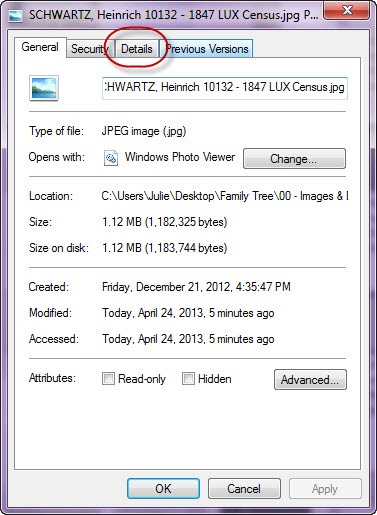
In order for me to know the source of the image, I simply use the source citation and place it in the Comments box in the properties of the image file. To do this on a PC, right-click on the file and choose Properties.
Then click on the Details tab.
Then type (or paste) the citation in the Comments field.
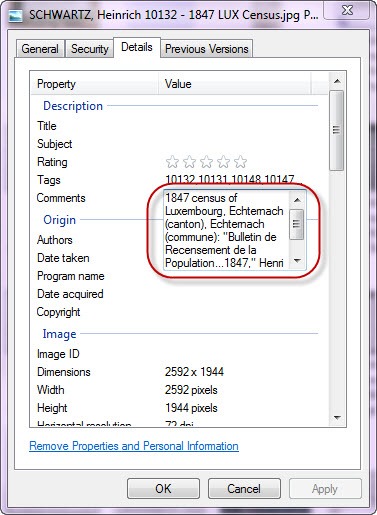
The other thing I do is add tags for all the people associated with a record. This way, I can run a search on a tag and find all of the images that pertain to that person, even if the image isn’t filed under that particular person. Remember I said I only save one copy of a census? This is how I compensate (same goes for photographs with multiple people). For the tags, I use the RIN number for each person so that it is consistent and I know who corresponds to who in my database.
You’ll notice in the image above, there is a Tag field right above the Comments field. So you would follow the same process to get to the Details and add in your tags.
Wrap-Up
I hope this post gave you some insight into how I manage my digital images. There are plenty of ways to organize your digital images; I’m simply sharing the way that works for me. I can’t say that it will work for you, as we all operate and think differently. But maybe it will or maybe it will spark an idea of your own that will work better for you.

Great post, Julie. I didn’t know how to add metadata so this was very helpful. Thanks!
P.S. I was going to +1 this post but I didn’t see an option to do that. Did I miss it? Instead, I pinned it! Thanks again.
Hi Nancy, glad to hear this was helpful to you. There is a way to share to various social media platforms including G+…at the end of the post there is a Share/Save button that allows you to post just about anywhere.
Nancy – did you just start numbering (RIN) your relatives, or do you use a program that assigns them? I’ve seen the numbering on other Genealogies, but I wasn’t sure how they started them.
Thanks!
Wendy
Also, when you link info to your photo’s and the RIN numbers, does that information only show up by going into the properties?
Thanks
Wendy
Hi Wendy, I use the RIN number which is assigned to each person automatically in my database. Whenever I add someone, they get the next number in line. The information that I place in the properties of the images/photos can be retrieved at any time by viewing the file’s properties. One thing I mentioned, but didn’t elaborate on, is that I can search by RIN. So in my Images & Documents folder, I can do a search for 96, and that will pull up all the files that contain the tag 96, which is my grandfather, no matter what surname folder they’re in. Unfortunately, it will also pull up files that contain 96 in the file name, text of a document, etc., but that’s okay with me. I don’t know if the search with Win 7 is different, but I could have sworn I used to be able to do advanced searches, telling it to look at the tags specifically…if that’s still an option in Win 7, I haven’t found it!
Thank you for getting back to me. What software do you use that does the automatic numbering?
Wendy
Hi Wendy, I use Legacy. I know that RootsMagic also uses RINs (and imports them from Legacy just fine). I’m pretty sure that most programs have some sort of RIN system, although it may be called something different. It’s basically the software’s way of assigning a “unique record number” if you will, to each person in the database. Hope that helps.
Thanks for this helpful post, Julie! I’ve been struggling to come up with a consistent naming pattern for my photo files, so I appreciate your examples.